Experience the real
If you’re searching for a Computer Skills i
will provide you with the personalized attention you deserve, look no
further! I am a knowledgeable private student with a few years of
experience, and have been offering my services as a Computer Skills
Teacher since 2018 in the greater india. I can help unlock your full
potential by providing the one-on-one attention you need in order to
succeed.
If you have any doubt in computer then contact me belowAbout Me
I’am studying in 9th standard at St.Sebastians H.S Chittatukara
I know programming languages likes : python,php,HTML,CSS,JavascriptGet in Touch
Contact Me
Learn programming
Computer Programming Courses. Take free online computer programming courses to build your skills and advance your career. Learn computer programming and other in-demand subjects with courses from top universities and institutions around the world on edX.
Draw animated tree in bash
BASH, Linux, Operating System, Program, Ubuntu, Unix Published:
December 25, 2016 Last Updated: December 25, 2016 Table of Contents Fork
Make A Gif It’s Christmas again and you’ll be receiving all kinds of
greetings. How about greeting them back with a fancy way ? Show off your
nerdiness with this super cool Christmas Tree in Bash. All you need is a
bash shell. Most systems have bash shell by default, so you don’t have
to install anything for this ! All thanks goes to the Argentian
programmer Sergio Lepore for this cool script. Here’s how it looks :
Christmas Tree in Bash Christmas Tree in Bash First of all open a
terminal and copy this script to your computer : wget -d -c -O
“christmas.sh” “https://raw.githubusercontent.com/sergiolepore/ChristBASHTree/master/tree-EN.sh”
Make the file executable : chmod u+x ./christmas.sh RUN !
./christmas.sh Ain’t that fancy ? All thanks goes to the Argentian
programmer Sergio Lepore for this cool trick. Fork You can make your own
little changes in the script to add your name and other stuff. I added
my name using this line : tput cup $((lin + 3)) $((c – 4)); echo
subins2000 I added the above line just after “And lots of CODE in
$new_year” line. You can do anything with this script. Maybe translate
it your own language or add more fancy stuff. Let me know what you have
done  Make A Gif Let’s make a gif of this great terminal gift. You can use
this gif to send to your friends or post on social networks. We’ll use a
screen recorder and a gif converter. For this, install these : sudo apt
install gtk-recordmydesktop ffmpeg winff Use gtk-recordmydesktop to
record the terminal. This will output a OGV file. Then do the following 2
commands to make the gif : ffmpeg -y -i input.ogv -vf
fps=10,scale=800:-1:flags=lanczos,palettegen palette.png ffmpeg -i
input.ogv -i palette.png -filter_complex
“fps=10,scale=800:-1:flags=lanczos[x];[x][1:v]paletteuse” output.gif If
you want to trim the video, you can add the following options to the
second command : -ss 3 -t 30 which stands for “start from 3rd second and
end at 30th second
Make A Gif Let’s make a gif of this great terminal gift. You can use
this gif to send to your friends or post on social networks. We’ll use a
screen recorder and a gif converter. For this, install these : sudo apt
install gtk-recordmydesktop ffmpeg winff Use gtk-recordmydesktop to
record the terminal. This will output a OGV file. Then do the following 2
commands to make the gif : ffmpeg -y -i input.ogv -vf
fps=10,scale=800:-1:flags=lanczos,palettegen palette.png ffmpeg -i
input.ogv -i palette.png -filter_complex
“fps=10,scale=800:-1:flags=lanczos[x];[x][1:v]paletteuse” output.gif If
you want to trim the video, you can add the following options to the
second command : -ss 3 -t 30 which stands for “start from 3rd second and
end at 30th second
Learn microsoft visual studio
Step 1 : Set up your IDEby Nicole Bruck
Before Installing
Let’s ensure that our machine is ready for us to install Visual Studio 2017. We’re going to need to do some updates and make some room!
✓ Apply the latest Windows updates
✓ Check for sufficient disk space
Download
Now let’s go get our Visual Studio 2017 download so that we can get ready to install!
✓ Download Visual Studio 2017
✓ The file will download and you should “Save As…” if needed
Install
Pick which components you would like to install or use our “default install” to get the most common tools.
✓ Locate the file, right-click and select “Run as administrator”
✓ Click to run
✓ Select “.Net desktop development”
✓ Install and wait until finished
Launch
You’re ready to rock and roll! Feel free to explore or get a head start with our next tutorial: Build an App.
✓ Restart your computer, if required
✓ Launch Visual Studio 2017
✓ Sign in (optional)
✓ Welcome!
Step 2 : Build an App
C# WinForms App
C++ Console Application
ASP.NET Core Web App
Create
We’re going to create an app to display, “Hello, World!”, which we will write in C# and run on Windows, specifically a WPF app.
✓ Create a WPF app named, “HelloWorld”
✓ Open the “Toolbox” and pin
Edit
We’re going to add a text area and button to our app. Then we’ll add an action to our button to display, “Hello, World!”
✓ Add a Button and TextBlock to your MainWindow.
✓ Add an action to the Button
Build & Run
Now we’re going to build the project so we can make sure that all the code works.
✓ Select the start button
✓ Click the button to see the dialogue
Step 3: Debug & More
The Visual Studio debugger helps you observe the run-time behavior of your program and find issues. With the debugger, you can break execution of your program to examine your code, examine and edit variables, view registers, see the instructions created from your source code, and view the memory space used by your application.

Creating drop down bar in html and css
There has always been big differences across how different browsers handle form styling. There probably always will be – because UI design choices aren’t described in the specs. Browser makers perhaps view this as one of the ways they can differentiate the user experience a bit. Select (dropdown) menus are one that is particularly weird.
When I say dropdown menu, I mean:
<select>
  <option>Apples</option>
  <option>Oranges</option>
  <option>Banannas</option>
</select>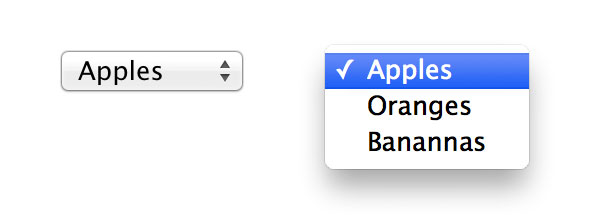
#What if you change the font-family?
select {
  font-family: Cursive;
}font-family won’t cascade into the select though, you have to explicitly declare it on them.#What if you change the font-size?
select {
  font-size: 32px;
}Firefox, Opera, and IE will respect your change but again only if explicitly declared on the select, it will not cascade.
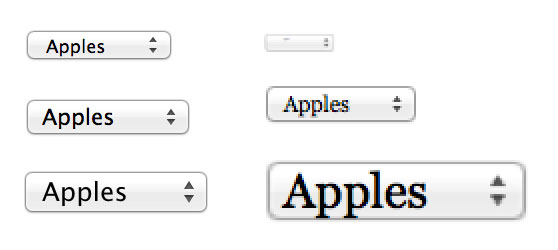
#Can you get WebKit to respect your changes?
Kinda. You can setborder: 0; on the selects and it will
make it look like a kinda crappy version of a dropdown but still have
some UI. It will also allow your font size and style choices to come
through.
-webkit-appearance: none; and you’ll
get what looks like a rounded corner input box, but still has the
interactions of a select (click to reveal menu, keyboard commands, etc).
It will also respect your font choices this way.
-moz-appearance: none; works it doesn’t remove all the chrome, just some. Opera doesn’t support appearance at all.#What about the dropdown itself?
As in, the thing that shows the choices when activated. As far as I know, there is no way to style these in any browser. Not even bold or italic. The closest thing to style you can get is grouping them by using